
You are using an out of date browser. It may not display this or other websites correctly.
You should upgrade or use an alternative browser.
You should upgrade or use an alternative browser.
O PC Lego da IBM
- Autor do tópico JOxAMD
- Data Início
")
AVxAMD
I fold therefore I AM
E agora só falta o texto.
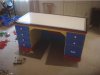
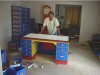
The Desk...
So it has been a while since I presented a new large scale model/sculpture.
Could it be that Eric has burned out on LEGO building?
Not exactly.
The projects are just getting larger...
In April of 2000 while on a business trip I received a near-frantic email from someone with an unusual request. It seems that she represented a fellow with a company in Seattle (no, NOT Microsoft). Turns out that last September this guy was hired, and in his contract of employment it stipulated that he wanted a desk made out of LEGO.
The hiring company evidently really wanted to hire this guy because their Human Resources department didn't scoff at the idea.
Sure, he could have a desk made out of LEGO bricks.
That was September 1999.
It was now seven months later, and the availability of LEGO desks was starting to dawn upon the company.
Their employee had no such desk.
And he wanted his desk.
Fortunately, that's where I come in. I'm not exactly sure how my name came up (Todd, thank you for the one referral I saw), but evidently when the emailing woman inquired on the Internet, she was given my name.
'Can you build us a desk out of LEGO? A full-sized desk, strong enough to hold a computer, with working drawers and everything?'
'Sure. I can build you a desk.'
We then flushed out the details. Brick costs were calculated. Designs were FAXed. Glue was discussed (oh... so much glue). Time schedules were planned.
In mid-June I finally received the down payment to cover cost of bricks (about $2000, if you're curious).
I began buying and building.
A few weeks later I had the desk built.
I had one more business trip on the West Coast to attend to, but when I returned, it was at the beginning of August and I now had to do the most painful thing in my LEGO career... I had to take one last, proud look at this desk... and I had to then take it apart, one piece at a time and then glue each piece back together.
All 35,000 pieces or so.
Actually, that's not quite accurate. Before I started taking it apart, I had to first roll the desk upside-down so that I could start disassembling from the bottom on one side and reassembling ground up on the other side.
A few minor design changes also had to be accommodated during the rebuilding/gluing phase, but slowly and tediously -- row by row -- I built the desk again. With glue.
About 7 pounds of glue when it was all said and done.
About 7 pounds of highly toxic, nauseous glue.
Three weeks later it was complete. Again.
Now it just has to be shipped to Seattle (which is gonna cost several hundred dollars).
What fun.
Here are some facts about The Desk:
Approximately 35,000 LEGO bricks were used. This includes almost all the pieces from 32 Blue Tubs (#3033), almost 300 (!) small baseplates (8x16 studs), and 63 blue plate packs from LEGO Shop-at-Home. A few other pieces were also bought from private collectors (226 tiles so the drawers could slide, et cetera).
The desk weighs about 120 pounds, I think. I have not actually weighed it... but I think that is close.
About 7 pounds of glue were used. Brand: Oatey, All-Purpose (PVC, CPVC, ABS) Glue.
The desk has the following dimensions (inches, WxHxD): 60" x 29.5" x 30".
It has 7 working drawers (six small, one large).
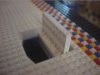
It has a folding lid in the top that conceals a hole for computer cables to drop through.
Yes, the top is bumpy -- studs up. I offered to make the top smooth, but the client specifically requested otherwise. Whatever. I also offered to build a retractable keyboard tray in the front, but that was not wanted. Nor a mosaic of the company logo on the top or sides.
Yes, I was paid to build the desk. Don't ask how much. It was worth my time.
The most interesting thing about this project was not the design of it (it was actually rather straightforward in my mind... I mean... it's a desk. Not too fancy... and drawers aren't hard at all). No, the part that took the most thought was the economy of pieces. While this desk was obviously costing the company a pretty penny, they still had a budget to consider, so I had to design the color scheme such that the bricks were used in a proportion which matched the Blue Tub distribution as closely as possible. I planned it pretty well, evidently, because in the end I had less than one Tub's worth left (except for those pesky 1x1s... about 2400 of which I used decoratively on the top).
I'm not gonna go into the trouble I discovered while gluing such a large model together (distortion of bricks, warping, etc).
It all worked out in the end.
And it should only take about a week for the glue-fumes to clear.
The Desk...
So it has been a while since I presented a new large scale model/sculpture.
Could it be that Eric has burned out on LEGO building?
Not exactly.
The projects are just getting larger...
In April of 2000 while on a business trip I received a near-frantic email from someone with an unusual request. It seems that she represented a fellow with a company in Seattle (no, NOT Microsoft). Turns out that last September this guy was hired, and in his contract of employment it stipulated that he wanted a desk made out of LEGO.
The hiring company evidently really wanted to hire this guy because their Human Resources department didn't scoff at the idea.
Sure, he could have a desk made out of LEGO bricks.
That was September 1999.
It was now seven months later, and the availability of LEGO desks was starting to dawn upon the company.
Their employee had no such desk.
And he wanted his desk.
Fortunately, that's where I come in. I'm not exactly sure how my name came up (Todd, thank you for the one referral I saw), but evidently when the emailing woman inquired on the Internet, she was given my name.
'Can you build us a desk out of LEGO? A full-sized desk, strong enough to hold a computer, with working drawers and everything?'
'Sure. I can build you a desk.'
We then flushed out the details. Brick costs were calculated. Designs were FAXed. Glue was discussed (oh... so much glue). Time schedules were planned.
In mid-June I finally received the down payment to cover cost of bricks (about $2000, if you're curious).
I began buying and building.
A few weeks later I had the desk built.
I had one more business trip on the West Coast to attend to, but when I returned, it was at the beginning of August and I now had to do the most painful thing in my LEGO career... I had to take one last, proud look at this desk... and I had to then take it apart, one piece at a time and then glue each piece back together.
All 35,000 pieces or so.
Actually, that's not quite accurate. Before I started taking it apart, I had to first roll the desk upside-down so that I could start disassembling from the bottom on one side and reassembling ground up on the other side.
A few minor design changes also had to be accommodated during the rebuilding/gluing phase, but slowly and tediously -- row by row -- I built the desk again. With glue.
About 7 pounds of glue when it was all said and done.
About 7 pounds of highly toxic, nauseous glue.
Three weeks later it was complete. Again.
Now it just has to be shipped to Seattle (which is gonna cost several hundred dollars).
What fun.
Here are some facts about The Desk:
Approximately 35,000 LEGO bricks were used. This includes almost all the pieces from 32 Blue Tubs (#3033), almost 300 (!) small baseplates (8x16 studs), and 63 blue plate packs from LEGO Shop-at-Home. A few other pieces were also bought from private collectors (226 tiles so the drawers could slide, et cetera).
The desk weighs about 120 pounds, I think. I have not actually weighed it... but I think that is close.
About 7 pounds of glue were used. Brand: Oatey, All-Purpose (PVC, CPVC, ABS) Glue.
The desk has the following dimensions (inches, WxHxD): 60" x 29.5" x 30".
It has 7 working drawers (six small, one large).
It has a folding lid in the top that conceals a hole for computer cables to drop through.
Yes, the top is bumpy -- studs up. I offered to make the top smooth, but the client specifically requested otherwise. Whatever. I also offered to build a retractable keyboard tray in the front, but that was not wanted. Nor a mosaic of the company logo on the top or sides.
Yes, I was paid to build the desk. Don't ask how much. It was worth my time.
The most interesting thing about this project was not the design of it (it was actually rather straightforward in my mind... I mean... it's a desk. Not too fancy... and drawers aren't hard at all). No, the part that took the most thought was the economy of pieces. While this desk was obviously costing the company a pretty penny, they still had a budget to consider, so I had to design the color scheme such that the bricks were used in a proportion which matched the Blue Tub distribution as closely as possible. I planned it pretty well, evidently, because in the end I had less than one Tub's worth left (except for those pesky 1x1s... about 2400 of which I used decoratively on the top).
I'm not gonna go into the trouble I discovered while gluing such a large model together (distortion of bricks, warping, etc).
It all worked out in the end.
And it should only take about a week for the glue-fumes to clear.


sLid3r.pt
Power Member
Originally posted by Raptor
Ainda nao sabe o que é bom!!!")
ahahahahah! vavava, acalma-te lá Raptor ;p
SkyWalker
Power Member
Originally posted by AVxAMD
Boas.
Tb já pensei em fazer isso,
seria um verdadeiro "mod" a 100%.
Tive que deixar de pensar nisso porque
a JO ia desmontar a "caixa" todos os dias
e eu não fazia mais nada do que montar aquilo
todos os dias.
Existe um problema ao fazer essa caixa,
o lego não absorve o calor ao contrário do
aluminio.
Logo vais ter de pensar num sistema para
arrefecer o interior da caixa.
Boa sorte.
Quanto a Desmontar, é claro que 1 das tampas laterais não tem necessáriamente ser de Lego, pode muito bem ser metal pintado de uma Cor/cores a combinar.
Quanto ao problema do aquecimento quando dos legos, e estes ficassem derretidos antes disso acontecer já a board e as placas que estão dentro do computador e todas as peças plásticas que fazem parte dos dirversos componentes de um PC estariam em cinzas 1º, e mesmo assim ainda sobravam alguns legos para eu brincar!
Quanto a caixas de alumínio, não servem de nada absorver o calor se não tiverem ventiladores a fazer exaustão do ar quente que se acumula dentro das caixas devido às placas, processadores e discos c/ a devida rapidez para o exterior!
Numa caixa de lego teria obrigatóriamente de ter uma extrutura que incluísse vários ventiladores para fazerem sair o ar quente e orificios para criarem um certo efeito de Vacuo e permitirem ao ar entrar por um ponto e sair rapidamente por outro.
Eu não tenho câmara digital senão já tinha postado na secção mods um exemplo que aqui tenho c/ a minha caixa, que como eu tenho isto configurado não necessido de ter dissipador a arrefer o disco por que onde ele está colocado a ventilação da caixa não deixa acumular calor, mantendo assim o disco a uma temperatura estável!